Here we are at the final installment of our 3-part series. These nine key exercises will help you create an excellent and powerful foundation for your body and your life, no matter what your vocation or avocation.
We originally started with the feet and made our way up the spine. Now it’s time to take a look at the head, neck and shoulders and then put it all together.
In my first career I was a hairstylist. Four years ago, after doing hair full time for 11 years and part time for 3 years, I finally retired my scissors for good. Over the course of my hairstyling career I developed a lot of pain in my body, mainly on the right side of my neck and my right shoulder. It was actually because of this pain that I found Pilates and I’m eternally grateful for that.
If I’d known about and used the first six exercises I’ve already shared, my body probably would have handled the stress of doing hair much better. But there’s SO much more to this than just handling the stress! We can actually improve things over time when we practice all these exercises.
If I’d had the knowledge of these next three exercises I know could have actually avoided the damage I did to myself completely. That’s a big deal and I want to share it with you so you can avoid the mistakes I made.
7. Relax The Shoulders
Ever notice how helpful the muscles in the neck and shoulders like to be? Especially in situations where you don’t need extra help like driving, working on the computer, talking on the phone, or in a Pilates session. You don’t intend to, but they always seem to tense up and creep toward your ears when you’re not noticing. I find mine in particular like to help when I’m practicing exercise #5.
When doing an activity that requires holding the arms up, like driving, or working on the computer, the upper trapezius muscles may tend to do more work than necessary. In my own body, my upper traps helped out way too much when I would cut and blow dry hair.
It’s not only tiring, but over time it creates chronic pain in the arms and shoulders and can also lead to headaches.
There are a variety of exercises and stretches that help correct this, but the first step in carrying less tension in the shoulders and neck is awareness.
Once you begin to catch yourself in the act of tensing the shoulders, you’ll more easily be able to relax them.
Next time you find your shoulders unnecessarily tense, take a deep breath and as you exhale, consciously relax them. Next, try lifting the shoulders up towards your ears, roll them back and feel the shoulder blades moving towards one another. Feel the chest open in this position.
Then draw the shoulder blades down the back and feel the shoulder blades spreading apart, feeling now as though you are closing the front of the chest. Pause, and feel the stretch between the shoulder blades and then draw the shoulders up towards the ears again.
Repeat two more times in this direction and repeat for three circles in the opposite direction. Go slowly, breathe and really exaggerate the movement.
8. Where Is Your Head In Space?
This is a biggie for me and with the amount of time a lot of people spend on the computer, riding in a car, or using a smartphone, I think it’s a biggie for most of us.
Take a second right now and notice how your posture is as you read this. Are you leaning forward to bring your head closer to the screen to read the text? Chances are high that you are. This is the way many of us spend large portions of our day.
Over time, holding the head forward in this manner for long periods, day after day, will alter the natural curve in the neck called the cervical curve. Instead of the weight of the head (which is between 8 -12 lbs) resting on the top of the spine and supported by the sacrum below, this weight ends up out in front of the spine. This triples the weight on the sacrum and puts a lot of strain not just on the neck, but also on the spine.
The muscles in the upper back get overstretched in an effort to support the neck and head. And even though they are overstretched, they get really tight. When this happens to a muscle it’s called “locked long” and it really hurts.
Once the muscles have locked in this holding pattern with the head out in front of the body, it takes time to retrain and encourage the muscles to go back into a more natural position.
However, here again, awareness is the first giant step to correcting this pattern.
To check for your own head and neck alignment, stand up against a wall with the feet a few inches from the base board. Ideally you want to feel your sacrum, base of the ribcage and the back of the head all against the wall.
If you have difficulty bringing the back of the head to the wall, then you can tell you have some forward-head-posture-alignment issues. The exercise below will get you started on the road back towards proper head and neck alignment.
- Sit down and feel your bottom bones grounded beneath you. Take a moment to lengthen your spine. Imagine pressing the ceiling away from you with the top of your head.
- Place one hand on the back of your head, above your occipital bone.
- Gently press your head against your hand. You will feel your skull slide back a little bit, but don’t tuck your chin in.
- Hold for 5-10 seconds and release.
- Repeat, pressing the head against the hand. This time while you are pressing back, gently press your head up as well. Hold for 5 – 10 seconds.
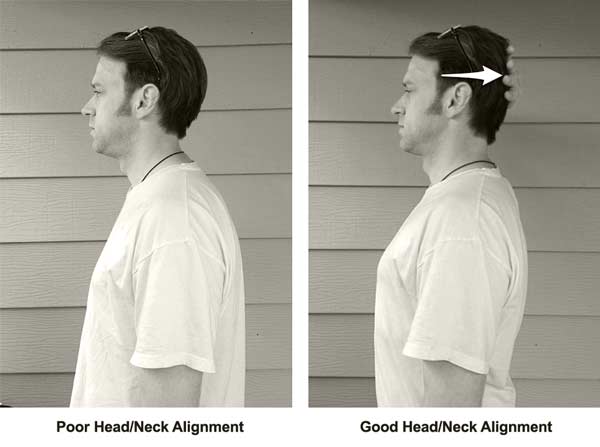
The six exercises discussed in the first 2 articles will help make returning to proper neck and head alignment easier.
Other things you can do:
• When reading, align your reading material as close to eye level as possible.
• Also when reading, or driving, notice if you are leaning your head forward in an effort to see where you are going, or what you are reading. If so, slide your head back without tucking the chin.
• When texting, lift your phone up closer to eye level. It may sound silly, but with the amount of time people spend texting, this excessive forward tilt of the head is going to alter the curve of the spine and eventually it’s going to hurt.
9. Putting It All Together and Practicing Patience
Developing new patterns in the body can feel really unnatural at first and takes time. Pick one foundational exercise to focus on each day and practice it three times, once in the morning, once in the afternoon and once in the evening.
As you begin to feel confident with how a specific exercise feels in your body, add another one to your practice. Continue to add each exercise. As time goes on, you’ll find that the feeling of new, more ideal alignment in the body feels more natural.
It’s this incorporation of these fundamental ideas into your daily life that creates the biggest changes. Ultimately, it’s all about awareness, specifically body awareness.
These exercises are the tip of the alignment iceberg and are designed to help you begin to discover patterns in your own body and create a healthy foundation that you can rely on for any physical activity you may ever do.
I hope to hear that you tried one or all of these exercises and noticed some changes in your body. And of course, we have many more great techniques that build upon these foundational exercises at Pilates Tonic so if you have specific issues that need a customized regimen, just let us know and we’ll be glad to help you create a specific practice designed just for your body.
If you have any questions about the exercises discussed here, or have experiences you’d like to share, please feel free to post in the comments below.
See you in the studio!
Sydney

4 Responses
The link to Part 1 of 9 Exercises Everyone Should Be Doing does not appear to be working.
Thanks for the content you are providing
Thanks for letting me know Alan!
I also do not find Part 1. Is it too late to get it?
Hi Kathy! I originally wrote this series in 2012, and after writing it, I continued to learn more about alignment—especially around the feet and knees.
Eventually, the information in Part 1 no longer aligned with what I know now, so I took it down.
That said, the posts below are updated versions of the information that was in Part 1:
Standing Alignment
https://www.pilatestonic.com/2020/were-getting-the-band-back-together-and-reshaping-your-booty/
Feet
https://www.pilatestonic.com/2023/say-goodbye-to-foot-pain-simple-exercises-for-better-mobility/
Knees
https://www.pilatestonic.com/2020/fix-your-tight-quads-and-thighs-with-this-unlikely-move/
https://www.pilatestonic.com/2022/fix-hyperextended-knees-even-if-you-dont-know-you-have-them/
If you have a little more time, this class goes into more detail:
https://www.pilatestonic.com/2020/your-glutes-were-made-for-walking/
Thanks so much for your interest!